Basics of Using Cryptomatte in Blender 2.93

In the buttons area (on the right side of the interface), select the “View layer properties” tab.

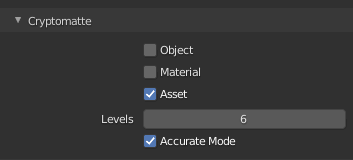
Under “cryptomatte” turn on “object”, “material” or “asset”. I like “asset” since it let’s me select entire rigs that consist of several parts.

Go to the “compositing” workspace.

Turn on “use nodes”.

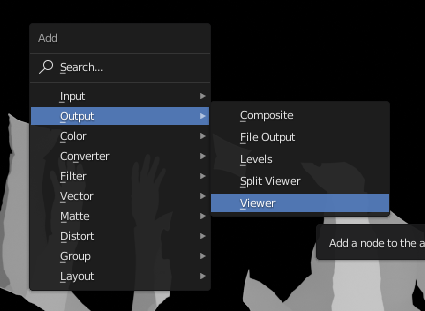
Add a viewer node with shift+a –> output –> viewer.

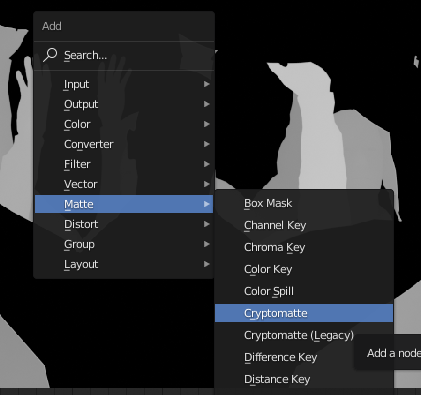
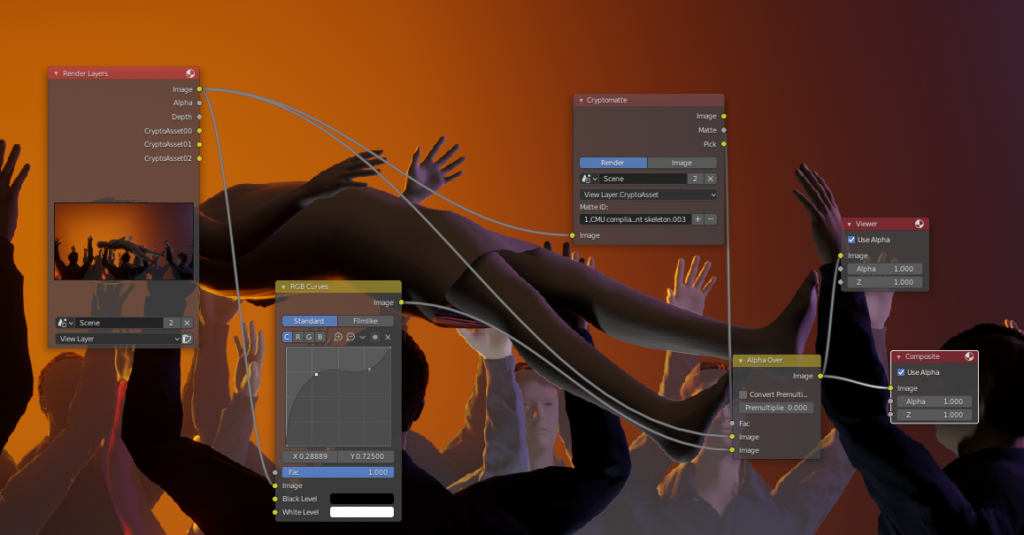
Add the cryptomatte node from Matte –> Cryptomatte.

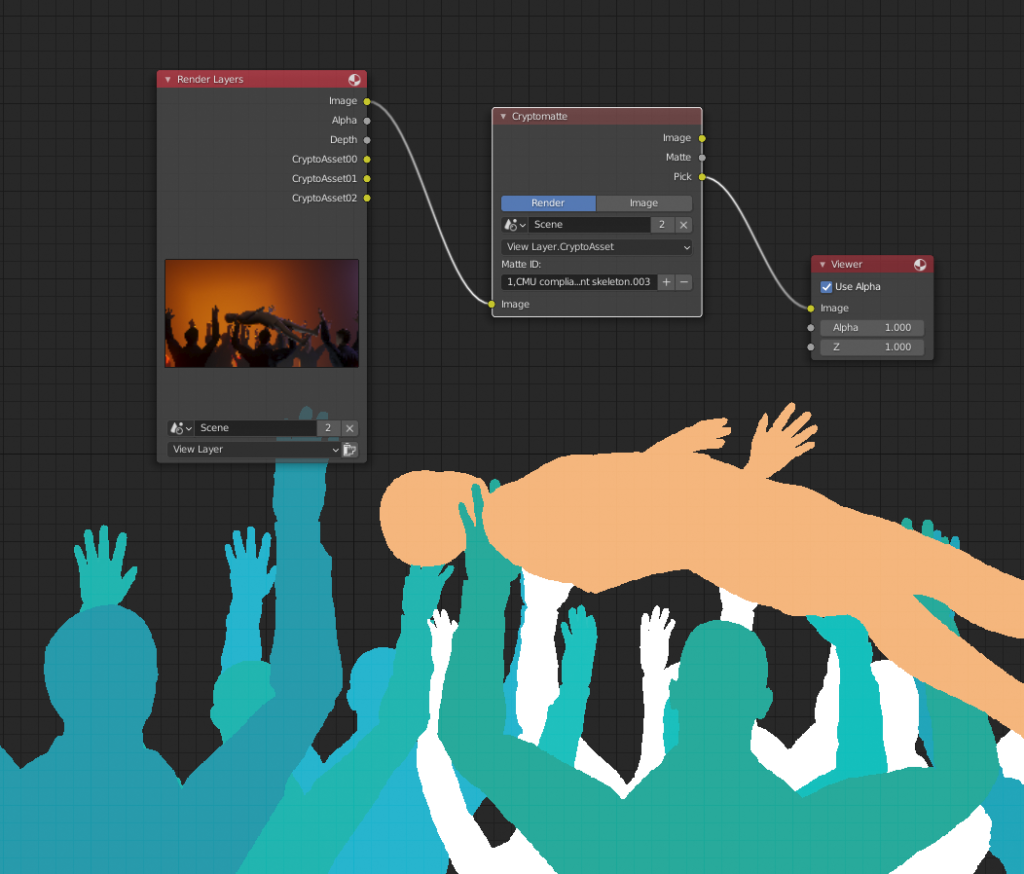
Connect the image output from the render layers node to the image input of the Cryptomatte node. Connect the “pick” output from the Cryptomatte node to the image input of the viewer node. Render the scene (keyboard shortcut F12).

You should now see different matte colors that identify different assets in your render layer. Use the + button to access the eyedropper tool and select as many assets as you need for the matte you are building.

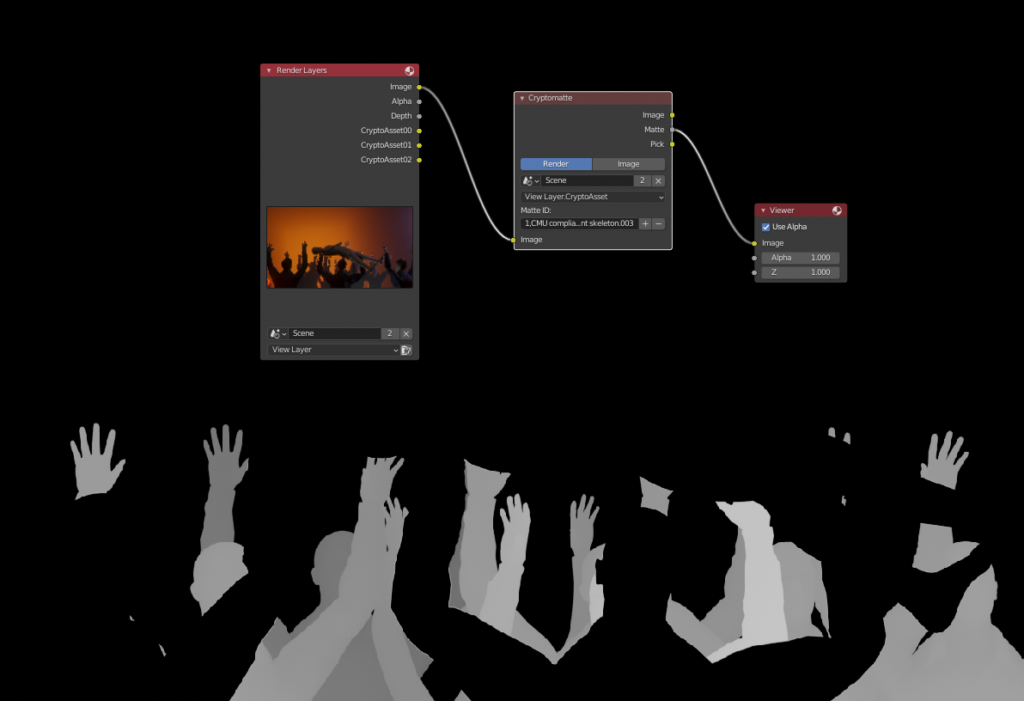
To see the actual matte, you can plug the “matte” output from the Cryptomatte node to the viewer.

Now you have a matte that you can use in various way when you are compositing. As a simple example, you could color correct the matted area by combining two copies of the input image with the “AlphaOver” node while using the matte as the factor. Then simply drop a color correction node like RGB curves between the bottom image connection.

Hair modeling tips for Blender

I have recently been doing hair renders in Blender and thought I would share some key tips that I have learned along the way:

  1. Use multiple particle systems. If you put all your hair in just one particle system, it becomes really tedious to edit the hair. You’ll end up combing hair that you didn’t mean to etc.
  2. Place the hair manually in hair edit mode (with the add hair brush). So set the initial amount to zero in the particle settings. Comb after every round of hair.
  3. Use simple children instead of interpolated, they are much easier to handle in the edit mode.
  4. To make the interpolated children more fluffy, increase the “radius” value.
  5. Be careful with the Path –> steps value, large values made my Blender crash.
  6. Use the Hair BSDF if you are rendering with Cycles. As of now that won’t work for Eevee so you’ll need to create your own shader for Eevee.
  7. Subdivide the roots of your hair in edit mode, because the hair needs more bend right where it comes out from the head. Also use enough keys when creating the hair strands.

Save bone selection in Blender

Did you know that you can easily save certain bones into a group in Blender so that you can selected those bones quickly when needed? Simply use the bone groups feature to group your bones into different groups that can then be selected from the same bone groups panel. This comes particularly handy when using the pose library: you probably want to create matching bone groups for the poses that you are creating, especially now that the poses are only saved and applied for the bones that you have selected. You can even give different groups of bones different color to be able to visually separate them from each other.

Here’s the process of adding bones to a bone group:

1. Select the bones you want to add to the group (in Pose mode for example)
2. Create a new bone group with the + button
3. Hit the assign -button

Now you can easily selected that set of bones any time from the “select” button.

Blender 2.8 Grease Pencil basics

Getting the started with the new grease pencil tool in Blender 2.8 can be a bit tricky at first. In this post I will simply list some “gotchas” that I bumped into in case it may help others:

Question 1:

Why can’t I create a fill color for my object with the fill-tool?
I’m clicking inside a closed stroke, but the stroke seems to be getting thicker instead of a fill appearing.

Answer:

You probably need to set the fill opacity alpha to 1. it’s zero for materials by default which makes the fill transparent.

Question 2:

How can I tween or interpolate between grease pencil shapes?

Answer:

The basic tween workflow can be tested like this:
-Draw a shape
-Duplicate the first keyframe on the dopesheet timeline (shift + d) and move it further in time
-Go to this second keyframe and enter the sculpt mode
-Change the shape of the stroke by sculpting
-Go between these two keyframes and from the “interpolate” menu on the top choose “sequence” to have Blender automatically create the in-betweens

Question 3:

Why does the brush size and strength change from what I set it to be in the top bar when I try to sculpt my strokes with grab tool in sculpt mode?

Answer:

Still working on the answer for this one! 🙂

Question 4:

What’s the difference between “Draw block”, “Draw ink”, “Draw Marker” “Draw Noise”, “Draw Pen” and “Draw Pencil”?

Answer:

Try them and you will see they all produce a different kind of stroke. The Draw Ink -brush doesn’t seem to do ink-like angles when painting with a mouse, but using a pressure sensitive tablet and pen helped.

Question 5:

How do I create new grease pencil layers or collections in 2.8?

Answer:

You can add new layers to grease pencil by selecting the little pen icon in the properties area (one tab before the materials tab) and creating layers there.

Question 6:

Where does the white background come from when using the new 2d-animation project preset?

Answer:

N-panel –> “grease pencil paper”

Question 7:

How do I select the grease pencil material before starting drawing?

Answer:

The option to select the material beneath the brush selection is grayed out for some reason. But here’s how you can choose your material colors before drawing anything: go to the materials tab and create a new material slot there. Add a new material to the material slot and change the settings to what you want. If you now draw with the grease pencil, new strokes should get this new material.

Question 8:

How can I assign different grease pencil layers different materials? At the moment changing the material seems to affect all grease pencil layers. I would like my fill layer to have a different material from my line art layer.

Answer:

Take the grease pencil object to edit mode, add a second material slot, add a new material to it, select the lines you want to affect (hiding the eye of the other layer can help), and click assign.

Question 9:

How can I change the origin of the grease pencil object?

Answer:

Place the 3D cursor where you want the new origin and go to object –> set origin –> origin to 3D cursor. Unfortunately this will also move move the location of the object. Now there is a very strange workaround at the moment (probably due to a bug), but you can set the position back to the original position after changing the origin by doing the following: object –> snap –> selection to cursor. And after that undo once and it seems to return to it’s proper location.

Question 10:

How can I quickly switch between draw mode and sculpt mode with a keyboard shortcut?

Answer:

I’m not sure if there is a default shortcut yet, but you can easily assign your own shortcut by opening the menu item, right clicking on it and selecting “assign shortcut”. The fastest and most future proof way might be to open up the pie menu with ctrl+tab and switching between the modes from there.

Basic workflow suggestion for 2.8 Grease pencil:
-Add a new empty grease pencil object in object mode (shift+a keyboard shortcut). This step is needed to be able to activate the draw mode in the next step.
-Switch from object mode to draw mode
-Select your pencil/brush type from the left side tool panel
-Modify your brush settings from the “tool settings” panel in the right side property buttons -area. You might want to try the turn on the “active smooth” for example to get an interesting, smooth and accurate drawing experience even with just the computer mouse.
-Sculpt your strokes in the sculpt mode. You can for example add width variations to the stroke with the width tool.
-Go to the materials tab and change stroke color and add a fill (change fill opacity to 1 first)

That’s it for now, I will append this article with more questions and answers as I continue studying the tool.

Best practices for creating new scenes in Blender

The possibility of creating new scenes comes really handy in Blender: instead of creating multiple .blend files and keeping track of them, you can have a single .blend file with various different scenes instead. You can create new scenes from the “Scene” menu at the top of the interface by clicking on the little + button. When you do so, you will be presented with five different options:
“New”
“Copy settings”
“Link objects”
“Link object data” and
“Full copy”

In this article we will explain the differences between those options.

NEW
Selecting “New” will create a completely empty scene with all the settings set to default. This is rarely what we want, since typically we want to use at least some common settings between the various scenes and usually we want to share things like meshes and armatures as well.

COPY SETTINGS
Selecting “Copy settings” will create a completely empty scene, but with similar settings than in the previous one. These settings can be things like the “render” settings and “scene” settings.

LINK OBJECTS
Selecting “Link objects” will create a scene with all the same objects and every aspect of them is linked together: if you rotate an object in the first scene, it will also rotate in the second scene. While one can imagine situations in which this is useful, it doesn’t offer us the flexibility of creating different animations in different scenes for the same objects. It can however be a handy starting point: perhaps you want some aspects of your scene, like the surroundings for example, to be fully linked so that if you reshape the landscape in scene 1 it will automatically also change in scene 2. You could combine that behavior with making some objects independent of each other with the “make single user” command.

Link objects can also be used as a clever way of alternating between different selections, since selected objects are scene-independent. So you could have some objects selected in scene 1 and other objects selected in scene 2 and then switch between those scenes simply to decide which set of selected objects you currently need.

LINK OBJECT DATA
Selecting “Link object data” will create a scene with all the same objects and settings. The objects will share the same meshes, vertex groups, materials etc but they can still be independently manipulated in object mode (like translated, rotated and scaled for example). Editing the mesh in edit mode will edit the mesh all the scenes. Creating a new animation in one scene will not repeat that animation in the other scene. However, any animations before creating the new scene will share the same action and if you edit such an animation in one scene, it will also change it in the other. If that’s not what you want, you need to make the action “single user” by selecting “object” –> “make single user” –> “object animation”. Now those two objects can be animated individually. This “link object data” option is probably the one to go for as it offers a good balance between freedom and connection.

FULL COPY
Selecting “Full copy” will create a scene with all the same objects and settings but everything will be an independent copy. So changing things in one scene will in no way affect the other. This is very stress free and gives you the ultimate freedom, but you also loose all connectivity and can end you up with a very bloated project file, because everything is always duplicated. So for example the same material can end up having tens or even hundreds of copies so changing the material can get tedious.

Six easy ways to speed up renders in Blender

1. Enable the “auto tile size addon”. This will automatically optimise the size of your render tiles for best possible performance.

2. Set the Light Sampling Threshold in the render settings (under the sampling settings) to something other than zero. The greater you make this number, the faster the render (but with some sacrificed quality, especially in the darker shadow areas of the image). Here’s what the Blender manual says about that setting:
Probabilistically terminates light samples when the light contribution is below this threshold (more noise but faster rendering). Zero disables the test and never ignores lights. This is useful because in large scenes with many light sources, some might only contribute a small amount to the final image, and increase render times. Using this setting can decrease the render times needed to calculate the rays which in the end have very little affect on the image.

3. Use GPU rendering. This one is probably a no-brainer these days, but in case you are not familiar with the fact, using the graphics processing unit instead of the central processing unit can greatly speed up your renders. Set it in the preferences –> system –> cycles compute device to your graphics card (which hopefully has Cuda support) and the switch to GPU rendering in at the top of the render settings.

4. Use denoising and drop your sample amounts. The new denoiser let’s you get clean images even with lower sample amounts. Simply turn it on in the “render layer” settings and let it work it’s magic.

5. Use the “simplify” option in the scene settings. Just check the “simplify” checkbox and set the “AO bounces” and “AO bounces render” to 2.

6. Render in the background using the command line. It can really speed up Blender when the user interface doesn’t have to be updated/maintained while rendering.
To do this in Windows perform the following steps:

-Go to your Blender installation folder (probably inside C:\Program Files\Blender Foundation) and shift+right click the folder called Blender, the choose “open command window here” from the list).

-Type in the following string without the quotes:

“blender -b pathToTHeFileToBeRendered -a”.

Here’s what this command means:
“blender” starts up blender.exe,
“-b” starts it in the background,
“pathToTHeFileToBeRendered” should be replaced by the path to your actual .blend file, which you can easily copy-paste by shift+right-clicking on that file and choosing “copy as path” from the list,
“-a” means that Blender should render an animation.

-Hit enter to start the render

Now if you are like me and start using the background rendering possibility a lot, you might feel annoyed having to always browse to the Blender installation location first.

So here is a handy little batch file that does the work for you. Just double click on it and It will open the cmd-window and automatically enter the Blender installation folder at C:\Program Files\Blender Foundation\Blender. Now you can just type the rest of the commands and start the render.
Here’s the bat-file download (unzip first after downloading):
blenderBGrender

Selection tips for Blender

Have you noticed how it can sometimes be difficult to select the right thing in Blender? You might for example need several clicks to select the object you want in object mode. That’s because Blender will take into consideration each object that is underneath the cursor when you click. Here are some tips that might help make selecting the correct object a little bit less frustrating:

Tip 1:
Hold down the alt-key when you right-click on an object. This will open up a selection menu which allows you to see all the objects that were under your cursor when you clicked. This will also work even when adding to an old selection, so that if you hold down shift and alt it will let you add the new object from the list to the current selection.

Tip 2:
See if changing the selection depth engine helps. You can find the option under Preferences –> System –> Selection. There you can test both “OpenGL Occlusion Queries” and “OpenGL Select” to see if one works out better for you.

Tip 3:
See if holding down the control-key while selecting helps. That will disable the depth check and select the object which origin is the closest to the mouse cursor during the click.

Tip 4:
Sometimes it can be really difficult to see the objects you have selected because the outline can be so thin. Luckily you can increase the outline width/thickness by going to preferences –> Themes –> 3D View and changing the “Outline width” property.