Do you just want to import a image to Godot and automatically create a same size 3d-mesh for it with alpha automatically handled correctly? I did, so I made a tiny Godot editor plugin that turns any image in your FileSystem into a perfectly-sized, alpha-friendly 3D quad. This post explains what it does, how to install and use it, and a few quick troubleshooting tips
What it is
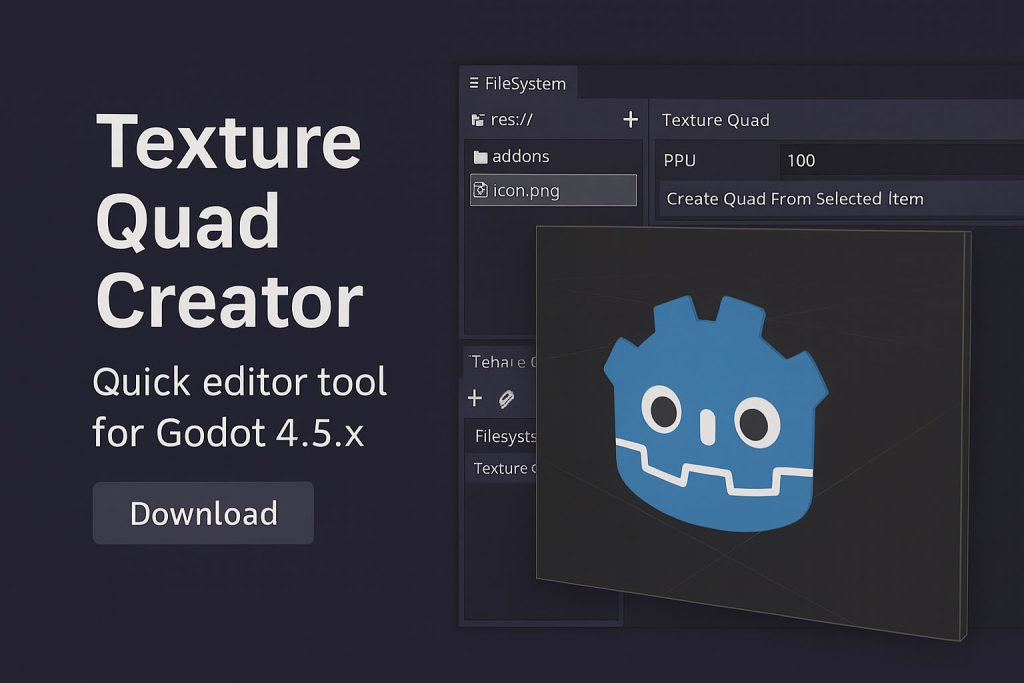
Texture Quad Creator is an EditorPlugin for Godot 4.5.x that:
- lets you select an image in the FileSystem dock,
- creates a new
MeshInstance3Dat the scene origin, - generates a
QuadMeshsized so the quad matches the image pixel dimensions (scaled by a configurable Pixels Per Unit value), - applies the image as a texture and configures the material for correct alpha/blending and no backface culling,
- selects the new node for immediate editing.
It’s aimed at artists and level designers who want to quickly place UI-like or 2D artwork into a 3D scene without manual mesh setup.
Key features
- Exact pixel → world unit sizing via Pixels Per Unit (PPU).
- Proper alpha handling (
TRANSPARENCY_ALPHA, alpha-to-coverage AA, culling disabled). - Works with common image formats Godot imports (PNG, JPG, WEBP, TGA, BMP, SVG).
- Adds the node directly to the currently opened scene and selects it immediately.
Install & enable
- Download the plugin zip and extract to your project
addons/folder so you have:res://addons/texture_quad_creator/plugin.cfg res://addons/texture_quad_creator/texture_quad_creator.gd - In Godot:
Project → Project Settings → Pluginsand enable Texture Quad Creator. - The dock appears (by default) in the right sidebar as Texture Quad.
How to use
- Open a 3D scene (the plugin adds the created node into the edited scene root).
- In the FileSystem dock, select an image (single click or Ctrl+click).
- Optionally adjust Pixels Per Unit:
- 1 PPU → 1 px = 1 world unit (huge in most projects)
- 100 PPU → 100 px = 1 world unit (good starting point)
- Click Create Quad From Selected Image.
- The new
MeshInstance3Dwill appear at the scene origin namedImageQuad_<filename>and be selected.
Tips & recommended workflow
- If your texture is used in 3D, check import settings (mipmaps / compression) and reimport if you need exact pixel rendering or no compression artifacts.
- Use
PPUto tune the quad scale so it fits your world. Try values like 32, 64, 100 depending on project scale. - If you want the quad to always face the camera, add a small
Billboardscript to it or parent it to aYSort/controller node.