Five DaVinci Resolve Tips to Boost Your Productivity
- Drag and drop folders of footage into Resolve with their folder structures intact. No more creating bins in Resolve for your various footage items. The solution is to drag and drop the folder from your operating system on the area which says “Master” which is typically on the left side of the Media pool. This will automatically preserve all your folder structures.
- Auto sync audio and video files. Many professional video productions will involve separate audio files from the video. Typically you have a low quality audio track embedded to the video coming from the video camera’s microphone and then you have a high quality set of audio files recorded with a boom or lavalier. When you start to edit such a setup in Resolve, one of the first steps is to sync the high quality audio with the video. To do that, simply select both the audio and the video clips (or even just the bins containing the audio and the bins containing the video) in the media pool and right click and choose “Auto Sync Audio”. From there I prefer the “Based on waveform and append tracks” because it will keep also the original audio in place for some sanity checks. It might take a while to complete and then it will give you a summary of the results. If you closed the summary, don’t worry, you can easily see which clips were synced with the audio by looking at them on the timeline. The ones that were successfully synced, will contain two audio tracks instead of just one.
- Use the 3D qualifier for great results when doing secondary color grading. You can find it in the qualifier tab. Then just draw a stroke over the colors you want to isolate for grading. View the matte from the magic wand looking symbol above the video monitor.

4. Temporarily disable/enable snapping mid-operation with the N-key. When you are dragging a clip on the timeline and realize that the snapping preference is not working for you, you can press N to temporarily diasable or enable snapping.
5. Automatically name your exported video using the project name. If you typically export your video files from the render queue using the name of the actual project, it may be a bit annoying to type in the File Name field, since you have already typed it once when naming the project. It would be nice if Resolve could automatically suggest the project name as the export name, but in the meanwhile you can type %Project Name in the field and then hit “Add to Render Queue” to get the same result. There are other variables you can access as well like %Timeline Name and %Render Resolution. The easiest way to access the variables in to just type a % in the field and Resolve will suggest all kinds of possible variables to you. It’s enough to just type %Proj and then hit enter in order to get the Project Name variable.
A browser based free tool for creating branching video game dialogues for game engines
Here is an open source web tool for making branching dialogue trees for games. The alpha version is aimed specifically at Construct 3 but there are also plans for more generic JSON exporters.
Check out Game Dialogue Maker here:
https://github.com/AnttiPerala/GameDialogueMaker
A tool for recoloring pixel art to a new color palette
I have been searching through the webs for a long time for a good, easy to use tool for recoloring pixel art to a specified color palette. The perfect tool should make it easy and fast to test out different palettes for a provided bitmap image or a sprite sheet, but it should also make it possible to fine tune the color mappings and add new colors to the palette if needed.
This has provided to be a rather challenging task. Photoshop and other similar graphics programs do have the possibility to switch to indexed color which lets you force the image to a new color palette, but I find that workflow to be rather tedious and time consuming. Illustrator has the recolor artwork tool, but it works only with vector images.
Here are some of the tools that I did find:
Continue reading “A tool for recoloring pixel art to a new color palette”Gamepad not working on a Mac?
Many people are reporting issues with various gamepads/game controllers and Macs. I was able to get a USB gamepad to work on my MacBook Pro (running MacOS Monterey) by installing (from the App store) a tool called Gamepad Mapper. Then I simply mapped the x-axis (which didn’t work at first) to keyboard keys (which my game also supports). I also had to allow this software in the security settings (accessibility submenu).
Now my Retro-bit NES USB controller works just fine with my Construct 3 video game. Check out the game King David RPG here:
Basics of working with timelines in Scirra Construct 3
Construct 3 has received a long-awaited feature when the Timelines got introduce a few years back. They have been built to be incredibly powerful, but getting started with timeline animation in Construct can feel confusing even for professional animators who are very familiar with concepts like keyframes and eases.
Here are the basic steps you should perform when you want to use the Timeline to create a rotation for an object:
-Right click somewhere in the layout editor and choose Timeline -new timeline
-Drag and drop an instance to the timeline
-Turn on editing (the pen icon)
-Select the instance and change it’s angle value in the properties bar
-Record this change as a keyframe by clicking on the + button to set keyframes
Here’s a few other tips:
-If you want to open the Timeline properties like the name of the Timeline, you need to click on the headers for things like the timeline name or a specific track. Then they will open up in the properties bar. Simply clicking on the Timeline bar itself is not enough.
-If you want to access the Timeline with events, you need to add the global timeline object to the project.
-You can zoom the timeline by scrolling while holding down ctrl
-To change the value of an existing keyframe, you don’t click “set keyframe” as in many other animation programs, but instead change the value, right click on the keyframe and choose “update”.
You can set any instance to play with the timeline using the “Set instance” action. Very handy for giving different objects the same animation.
One way of uniquely identifying a timeline is to give them a unique tag, possibly based on the UID of the instance involved.
If you want to do something with the instance you play with a timeline, one easy option for that is using the “system –> wait for previous actions to complete” action, which will wait for the timeline to finish and allow you to operate on the instance right after that.
One really powerful feature is the ability to add tags to master keyframes (the round ones). These tags can then be used to trigger various events in order to make things happen in sync with your animation.
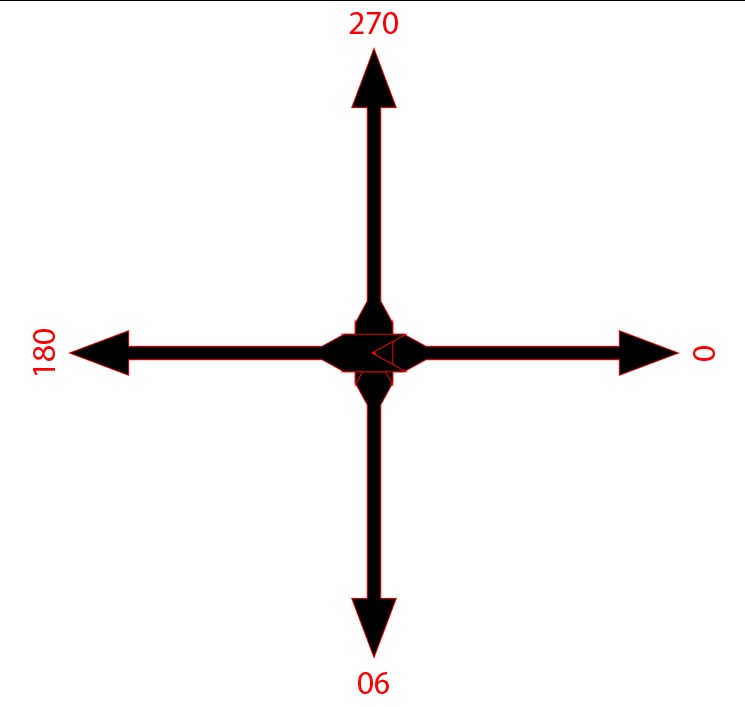
Construct 3 Rotation Angles Reference
If you have trouble remembering how Construct 3 calculates rotation angles, here is a quick chart for you. Note that movingAngles (which I believe are directional vectors) use a different coordinate system in which values can be also negative.
If you want to to make the movingAngle of the moveTo behavior change the animation of a character to left or right, one option is to do this:
- System: (bird.MoveTo.MovingAngle+360)%360 within 88 degrees of 180
-> bird: Set animation to “flyLeft” (play from current frame) - Else
->bird: Set animation to “flyRight” (play from current frame)
The (angle+360)%360 expression converts the values to a range of 0-360 and then we can simply check if we are within a certain degree of 180 which points left and if that’s true we set the animation to the left one.
Blender keyboard shortcuts for working with nodes
Being able to work efficiently with different kinds of nodes in Blender is becoming increasingly important. These basic node related keyboard shortcuts should work in all of the Node editors in Blender including material nodes, the compositor and geometry nodes.
Add new node: shift+A
Just like you can add new objects with shift+a, the same shortcut also works for adding new nodes. If you want to immediately enter the search mode, read about the next shortcut below.
Add new node and search immediately: shift+A, then S
If you want to search for the name of the node instead of browsing through the categories, hit s immediately after hitting shift+a and it will take you to the search bar.
Disable a node: M
Sometimes you just want to see the results of a node tree without a certain node. In that case you can easily mute a node by selecting it and hitting M on your keyboard.
Delete a node: X
Just like you would expect, hitting X on the keyboard will delete the selected node(s).
Delete with reconnect: ctrl+X
If you want to delete a node in the middle of a node tree and automatically connect the node that came before the deleted node to the node where the deleted node was connected to, simply hit ctrl+X to delete the node from between.
Backdrop Zoom: V and alt+V
If you need to zoom out of the backdrop image to see it completely, just hit V on the keyboard. Zoom in by pressing alt+V.
Duplicate a node: shift+D
To make a duplicate of the selected node(s), just hit shift+D on the keyboard.
Connect a node to the viewer: ctrl+shift+leftclick
If you want to quickly connect a node’s output to the viewer node to see the result of the node, just hold down shift and control and left-click on the node you want to connect.
Cut a node connection: ctrl+rightclick-drag
If you want to cut a node connection, hold down control and the right mouse button and drag over the connection line.
Collapse node: H
Sometimes you want to collapse a node so that it takes less space. To do that, simply select the node and hit H on your keyboard and the node inputs will no longer be visible. If you want to reopen a collapsed node, simply hit H again.
Create node group: ctrl+G
Grouping nodes together allows you to simplify your node trees. By grouping several nodes together it is like combining them so that they appear to be just a single node. Simply select the nodes that you want to group together and hit ctrl+G. Note that all node types cannot be grouped together. For example you can’t put the “render layers” node in a node group.
Enter or exit node group: tab
After grouping nodes, Blender will automatically take you inside the group. To exit the node group, press tab on the keyboard. Similarly, to enter a node group, select the group and press tab.
How to Screenshot Whole Website with Firefox
Create ngon face with a hole in the center in Blender 3.0
In this quick tip we demonstrate an easy way of creating ngon faces that have holes in the center.
Written instructions:
Continue reading “Create ngon face with a hole in the center in Blender 3.0”