Written instructions:
Continue reading “How to Screenshot Whole Website with Firefox”Create ngon face with a hole in the center in Blender 3.0
In this quick tip we demonstrate an easy way of creating ngon faces that have holes in the center.
Written instructions:
Continue reading “Create ngon face with a hole in the center in Blender 3.0”LBRY Credits (LBC) Paper wallet how-to
LBRY is a blockchain-based content platform, which uses the LBC cryptocurrency in its operation.
If you are interested in holding large sums of LBC, you might be interested in using offline paper wallets. Below I will walk you through the basic steps.
Continue reading “LBRY Credits (LBC) Paper wallet how-to”Blender Quick Vid: Spin tool
Key tips for the spin tool:
-3d cursor location will be the center point of the spin
-3d viewport orientation matters
-select the spin direction from the top bar
-hold ctrl to snap to increments
Adding headings to block based widgets in WordPress
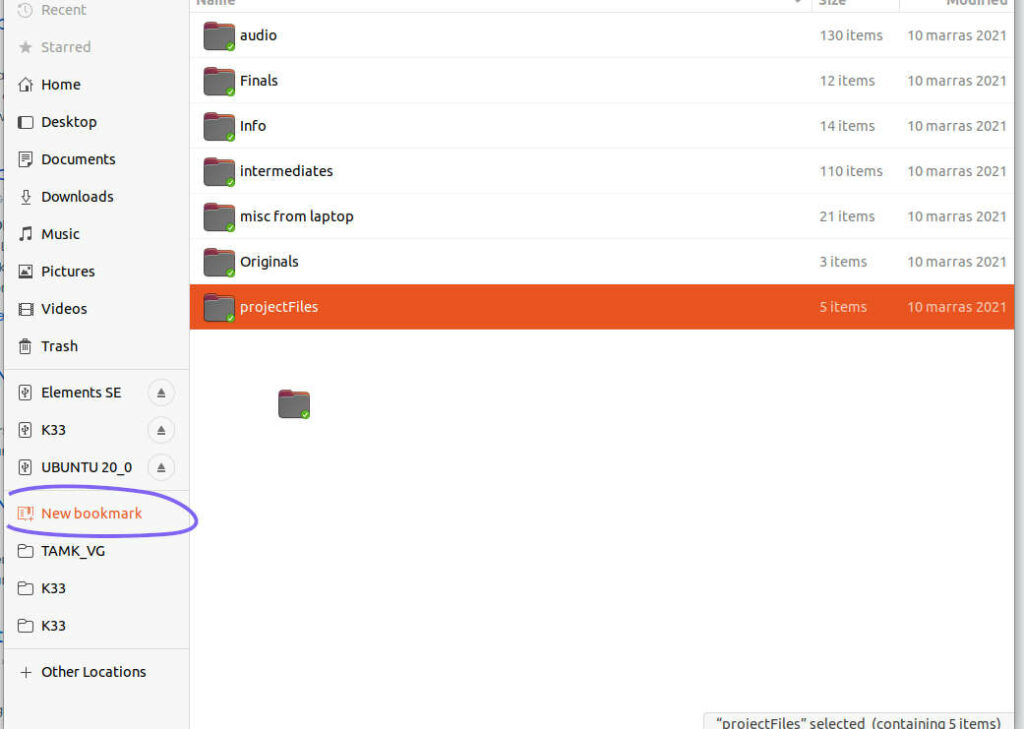
Add favorite folders in Ubuntu
A standard Ubuntu installation with Gnome as the desktop has a starred locations option in the sidebar. That sounds like an obvious way of adding often used folders to favorites so that you can access them quickly and easily.
Unfortunately it turns out that the “starred” feature doesn’t always work as easily as you would hope. You might think you could simply right click on a folder and choose to star it from the context menu. But there is no such menu option. Some people have gotten adding stars to work by going to the list view, and right clicking on the column header to then add “Star” as a column. But even when I could add that column and see the star, I still couldn’t turn the star on for the folder that I wanted. It seems like this feature might work mainly for indexed locations.
Luckily there is another way of adding favorites or bookmarks to Gnome. Simply start dragging a folder towards the sidebar on the left. Now pay attention to a little button that appears which says “new bookmark”. If you drag the folder on top of that, it will now appear in the sidebar as a handy bookmark.
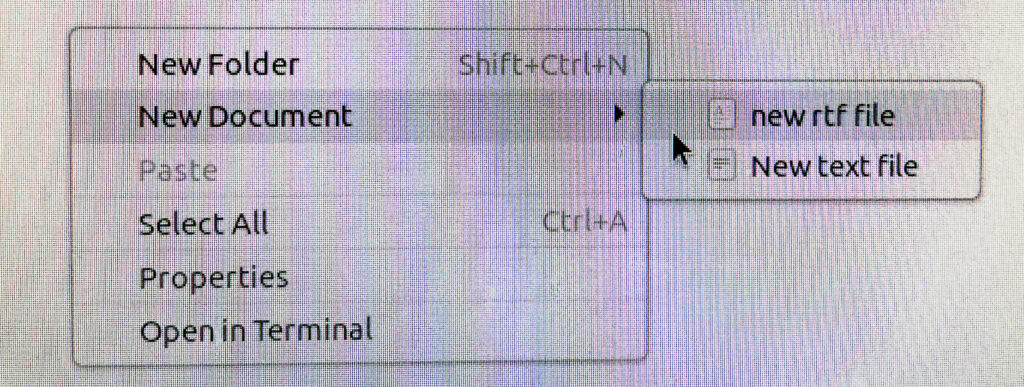
Create new files by right-clicking on Ubuntu
I just learned a really helpful tip regarding Linux Ubuntu. I have been missing the possibility to quickly create new files by right-clicking on a folder. With this simple technique you can create all kinds of files quickly and easily. The steps are really simple:
- Open the program that can create the files that you need. For plain text files for example you can open Gedit (or “Text editor”).
- Save a file with the desired format and desired default name into the Home/Templates folder.
- Now you can simply right click anywhere on a folder and you have the ability to create those files.
How to use solid collision filtering with Tile movement in Construct 3
Solid collision filtering is a really useful feature in Construct 3, but it’s not very well documented.
Continue reading “How to use solid collision filtering with Tile movement in Construct 3”Finally a sprite sheet recoloring process that works
I have been searching for a good workflow for testing out different color palettes for existing video game designs.
I have finally found a relatively pain free method of testing different color palettes and applying them to entire games. I will be making a video tutorial about this in the future, but before I get to that, I thought I would already explain the basics of the workflow.
Continue reading “Finally a sprite sheet recoloring process that works”