How to View Encrypted Filezilla Passwords as Plain Text
Free and Open Source Browser-based Font Manager
I couldn’t find a simple free font manager for managing all my fonts, so I decided to create one using Node.js.
It takes in a fonts-folder of your choosing (and it can also read all the nested sub folders) and lets you easily preview and categorize your fonts. It works on Windows, Mac and Linux. I’m giving it away for free here:
Free script: Easy focusing while animating a camera in Blender
While animating a camera, it is often desirable to quickly set the focus on a specific object. The “Focus on Object” field in Blender is incredibly useful for this, allowing the quick selection of a focus object via the eyedropper tool. However, once this link is set, it remains permanent. If the link is severed, the focus on the specified object is lost. I sought a solution that would allow me to capture the correct focus distance based on the focus object before severing the link. This led me to develop a script that not only calculates but also sets the “Focus Distance” field automatically to the appropriate value. This script triggers when the focus object property changes from empty to populated. It then calculates the distance, logs it in the console, and sets the focus distance. Now, you can break the link to the focus object while retaining the focus based on the last calculated distance.
How to Use the Script:
- Open Blender and Set Up Your Scene: Ensure your scene contains at least one camera and other objects you might want to focus on.
- Open the Scripting Tab: Navigate to the ‘Scripting’ tab in Blender to access the Python console and scripting area.
- Paste the Script: Copy the script provided below and paste it into a new text editor within the Scripting tab.
- Run the Script: After pasting, run the script by pressing the ‘Run Script’ button. This will activate the script, and it will start monitoring changes to the focus object property.
- Use the Camera’s Focus Object Field: Go to your camera’s object data properties and under the depth of field settings, use the eyedropper to select a focus object from your scene. The script will automatically update the “Focus Distance” to match the distance to the selected object.
- View the Output: Check the console (located in the same Scripting tab) to see the printed focus distance. This value is also automatically set in the camera’s “Focus Distance” field.
- Sever the Link If Desired: You can now sever the link to the focus object without losing the focus distance, as it has been set manually based on the last calculation.
- Here is the script:
import bpy

# Global variable to keep track of the last focus object
last_focus_object = None

def update_focus_distance_if_needed(scene):
    global last_focus_object
    camera = scene.camera

    if camera and camera.data.dof.use_dof:
        current_focus_object = camera.data.dof.focus_object

        # Check if the focus object was None and now is set
        if last_focus_object is None and current_focus_object is not None:
            # Calculate and update the focus distance
            camera_location = camera.matrix_world.translation
            target_location = current_focus_object.matrix_world.translation
            focus_distance = (target_location - camera_location).length

            camera.data.dof.focus_distance = focus_distance
            print(f"Focus distance updated to: {focus_distance}")

        # Update the last known focus object
        last_focus_object = current_focus_object

def register_handlers():
    global last_focus_object
    # Initialize last focus object
    camera = bpy.context.scene.camera
    if camera and camera.data.dof.use_dof:
        last_focus_object = camera.data.dof.focus_object

    # Add handler
    bpy.app.handlers.depsgraph_update_pre.append(update_focus_distance_if_needed)
    print("Handler registered to monitor focus object changes.")

register_handlers()
Automating the import of hundreds of sprites to Construct
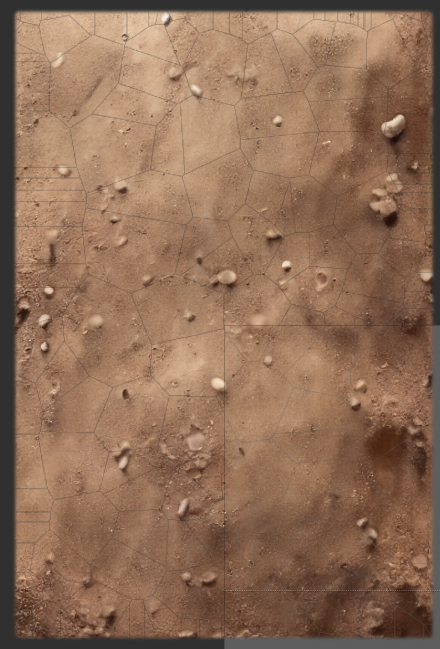
I’m making a game where an area of ground is broken piece by piece. I managed to create a python script that uses a voronoi pattern to shatter my image into several small irregular pieces. Here’s how that looked:
I then needed to import those 200 pieces into Construct. I figured out that if I set the position of each piece to 0,0, they would form the full image perfectly. After that I can just crop the pieces to their actual pixels and things work really nicely: the voronoi jigsaw puzzle comes together like it should.
The only pain point I had left was importing 200 sprites one by one into Construct. I knew that I could drag them all at the same time on top of Construct, which would create an animation. But I needed to create several individual sprites instead of animation frames.
The real life saver in this situation turned out to be the Project Folder feature in Construct (works best in Chrome), since it gives direct access to the project file structure. So here are the steps I performed and the scripts I used:
Please don’t attempt this with your production code, instead start a new empty Construct project and save it as a Project Folder on your local hard disk
1. Use a Python script to loop through all the image files in a folder and have it generate the JSON files Construct expects to have in the objectTypes folder. Here is the script for that (zipped due to security considerations). To run that, just unzip, place it in the same folder with the images, open a terminal there and type: python generateProjectJSON.py and hit enter. A bunch of JSON files should appear which you should copy to your Project Folder’s objectTypes folder.
2. Next the project.c3proj file needed to have the files listed in the items array in this manner:
“objectTypes”: {
“items”: [
“myImage_0”,
“myImage_1”,
“myImage_2”
],
So made a script to generate the array. Note that this is a very simple script and could be improved to support more files name conventions. At the moment it is just adding an incrementing number at the end of each image name. This script will output a simple array in a file called names.txt. Copy the array to your project.c3proj file.
3. The images needed to be renamed with -default-000.png appended to their file name. Time for another script, run this similarly in the folder with the images. After that I copied the images into the images folder inside the Project Folder.
4. That’s basically it but I also wanted the sprites already placed in the layout at coordinates 0,0 so I wrote one more script to do that. Run this script where you have your JSON files (that we generated earlier) and it will give you a new file called new_layout.json. Take the “instances” array from the generated file and merge it with your Layout 1.json file (which can be found in the layouts folder).
Now just reload the project and something magical happens: all your images will appear in the project and in the layout! Even if it’s hundreds or even thousands of images.
So there we have it. This workflow is obviously not useful if you just need to import a small number of sprites. But if you needs hundreds, then this can definitely save you some frustrating manual labor.
How to pause browser execution when F8 is not working
Let’s break down a simple trick that can help you manipulate and understand your code better.
To begin with, access your developer console. This can usually be found in your browser’s Developer Tools under the ‘Console’ tab. Depending on the browser you’re using, you might need to use different shortcuts (like F12) or methods to open it. But don’t worry, a quick search on how to open the developer console in your specific browser should get you on the right track.
Once you’ve opened the console, the next step involves entering a particular command. All you need to do is simply paste the provided command line in the console. This is what we’re going to use to manipulate our code. After pasting the command, hit the ‘Enter’ key to execute it.
document.addEventListener('keydown', function (e) {

if (e.keyCode == 119) { // F8

debugger;

}

}, {

capture: true

});
Now, your code should still be in an ‘unpaused’ state. But when you press F8 on the keyboard, it should pause. It’s like freezing a moment in time, letting you thoroughly inspect and understand how your code behaves for specific elements. This can be especially useful when debugging hover-effects and mouseovers.
With this simple trick, your web development toolkit has a new superpower! Experiment, explore, and let your code reveal its secrets to you. Happy coding!”
Remove weird box characters from pasted text in VS Code
Today, we’ll be discussing a common issue you might encounter when copying and pasting text from other programs into Visual Studio Code.
At times, you may notice strange boxes appearing in your pasted text. These boxes represent unrecognized characters in VS Code. They usually occur due to discrepancies between character encoding standards across different programs.
If you’re looking for a quick fix to eliminate these, here’s a simple process you can follow:
First, select and copy one of these unknown box characters. Next, open up the ‘Replace’ dialog box. Paste the copied box character into the ‘Find’ field of the dialog box. Then, leave the ‘Replace’ field blank. Upon clicking ‘Replace All’, VS Code will replace all instances of this unrecognized character with nothing, essentially removing them from your text.
And there you have it! Your pasted text is now free of any unknown characters.
Thank you so much for watching and see you next time on OneMinuteVideoTutorials.com
How to concatenate strings and variable values in GDevelop
I’m currently studying the relatively new open source “code free” game engine GDevelop, so I will write some tips and tricks regarding it here.
One basic thing you should learn to do in any game engine is mixing strings and variable values together. The way to do this varies in different game engine.
In GDevelop, you can do this:
"Score is " + GlobalVariableString(myVar)Render a folder full of STL files to PNG images
I wanted to create images out of all the STL-files I had 3D-printed so far. Here is a script that automates the process using Blender.
import bpy
import os
import math
from bpy_extras.object_utils import world_to_camera_view

def clear_scene():
    bpy.ops.object.select_all(action='SELECT')
    bpy.ops.object.delete()

def setup_camera_light():
    bpy.ops.object.camera_add(location=(0, -10, 5))
    camera = bpy.context.active_object
    camera.rotation_euler = (1.0, 0, 0)
    bpy.context.scene.camera = camera

    bpy.ops.object.light_add(type='SUN', align='WORLD', location=(0, 0, 10))
    light = bpy.context.active_object
    light.rotation_euler = (1.0, 0, 0)

def create_red_material():
    red_material = bpy.data.materials.new(name="RedMaterial")
    red_material.use_nodes = True
    red_material.node_tree.nodes["Principled BSDF"].inputs["Base Color"].default_value = (1, 0, 0, 1)
    return red_material


from mathutils import Vector

def set_camera_position(camera, obj):
    bound_box = obj.bound_box
    min_x, max_x = min(v[0] for v in bound_box), max(v[0] for v in bound_box)
    min_y, max_y = min(v[1] for v in bound_box), max(v[1] for v in bound_box)
    min_z, max_z = min(v[2] for v in bound_box), max(v[2] for v in bound_box)

    # Calculate object dimensions
    width = max_x - min_x
    height = max_y - min_y
    depth = max_z - min_z

    # Calculate object center
    center_x = min_x + (width / 2)
    center_y = min_y + (height / 2)
    center_z = min_z + (depth / 2)

    # Calculate distance from camera to object center
    distance = max(width, height, depth) * 2.5  # Increase the multiplier from 2 to 2.5

    # Set camera location and rotation
    camera.location = (center_x, center_y - distance, center_z + (distance / 2))
    camera.rotation_euler = (math.radians(60), 0, 0)


def import_stl_and_render(input_path, output_path):
    clear_scene()
    setup_camera_light()

    bpy.ops.import_mesh.stl(filepath=input_path)
    obj = bpy.context.selected_objects[0]

    # Set camera position based on object bounding box
    camera = bpy.context.scene.objects['Camera']
    set_camera_position(camera, obj)

    # Apply red material to the object
    red_material = create_red_material()
    if len(obj.data.materials) == 0:
        obj.data.materials.append(red_material)
    else:
        obj.data.materials[0] = red_material

    # Set render settings
    bpy.context.scene.render.image_settings.file_format = 'PNG'
    bpy.context.scene.render.filepath = output_path
    bpy.ops.render.render(write_still=True)

     # Set transparent background
    bpy.context.scene.render.film_transparent = True

    # Set render settings
    bpy.context.scene.render.image_settings.file_format = 'PNG'
    bpy.context.scene.render.filepath = output_path
    bpy.ops.render.render(write_still=True)

def render_stl_images(input_folder, output_folder):
    for root, _, files in os.walk(input_folder):
        for file in files:
            if file.lower().endswith(".stl"):
                input_path = os.path.join(root, file)
                output_file = os.path.splitext(file)[0] + ".png"
                output_path = os.path.join(output_folder, output_file)

                import_stl_and_render(input_path, output_path)

if __name__ == "__main__":

    if __name__ == "__main__":
        input_folder = "3D Prints"
        output_folder = "/outputSTL"

    if not os.path.exists(output_folder):
        os.makedirs(output_folder)

    try:
        render_stl_images(input_folder, output_folder)
    except Exception as e:
        print(f"Error: {e}")
How to use:
Save the script in a python file. You can call it for example renderSTL.py. Change the input and output folders in the script to fit your situation.
Make sure you have Blender in PATH so that you can run it by simply typing “Blender” in a command prompt. If you don’t have it in PATH, open “enviroments variables” and edit the “PATH” variable under “system”. Add the path to your Blender installation as a new path.
Open up a command line in the folder which has the proper path to your STL root folder and paste this command in:
blender –background –factory-startup –python renderSTL.py
Blender should now render images out of all your STL files in the background and save them into the output folder.
Find out the sequence number of the latest commit in a Github repository
To find out the order number (or how manyeth) the latest commit is in a Github repository, open up the command line in the folder of your repository and type in:
git rev-list --count HEADFind out the number of a commit using it’s SHA:
git rev-list --count <commit-SHA-1>

git rev-list --count 0b26b659f33332c70ebaa962d21171c5ffda27e5