Sometimes you need to update values incrementally in your WordPress database. You might for example have an upvote feature to which you automatically add points in an incremental fashion.
It was surprisingly hard to find examples of how to do this using Wpdb. But here’s an example of doing just that:
/* Have to use wpdb->query instead of wpdb->update because the latter assumes strings  */
  $results = $wpdb->query($wpdb->prepare("UPDATE foodsenglish SET popularity = popularity + 1 WHERE dbID = %d", $foodIdToSendThePointFor), ARRAY_A);
TIP: If you forgot to include the installer.php file, you can unzip the zipped archive and copy the “installer-backup.php” file from there and just rename it “installer.php”.
In the Duplicator FAQ they recommend uploading the packages through the “theme folder” button in IWP. That didn’t really make a difference in my tests though (I just uploaded the files by copy-pasting with SFTP Net Drive). Note that the installer will throw an error if there are other files present in the installation folder so make sure you delete the old WordPress files. Unfortunately even with these steps we seem to get stuck on Step 3. I recommend checking the error log if this happens. You might need to install php-xml with sudo apk add php-xml. Or you might have to update your PHP version if you are getting errors like this;
INSTALLER ERROR: [PHP ERR][FATAL] MSG:Uncaught Error: Call to undefined function token_get_all() in /var/www/localhost/htdocs/wordpress/duplicator/dup-installer/lib/config/class.wp.config.tranformer.php:387
That wasn’t the main problem in my case though (it seems like a function should be enabled “By web host”).
If you get an error when trying to install that the folder doesn’t have write permissions, do the following: Check the working directory you are in with “pwd” and the contents of the folder you are currently in with “ls”. You might have to elevate yourself to root user with sudo -s and the type in cd /var/. If you can see “var” in the list, then cd into it with cd var. You can cd into localhost even if it’s not listed with cd localhost. You shouldn’t need to change folder permissions here, but if you need to do that in some other situation, you can use chmod like in this example we are giving a folder called wp2 full permissions: chmod 777 wp2.
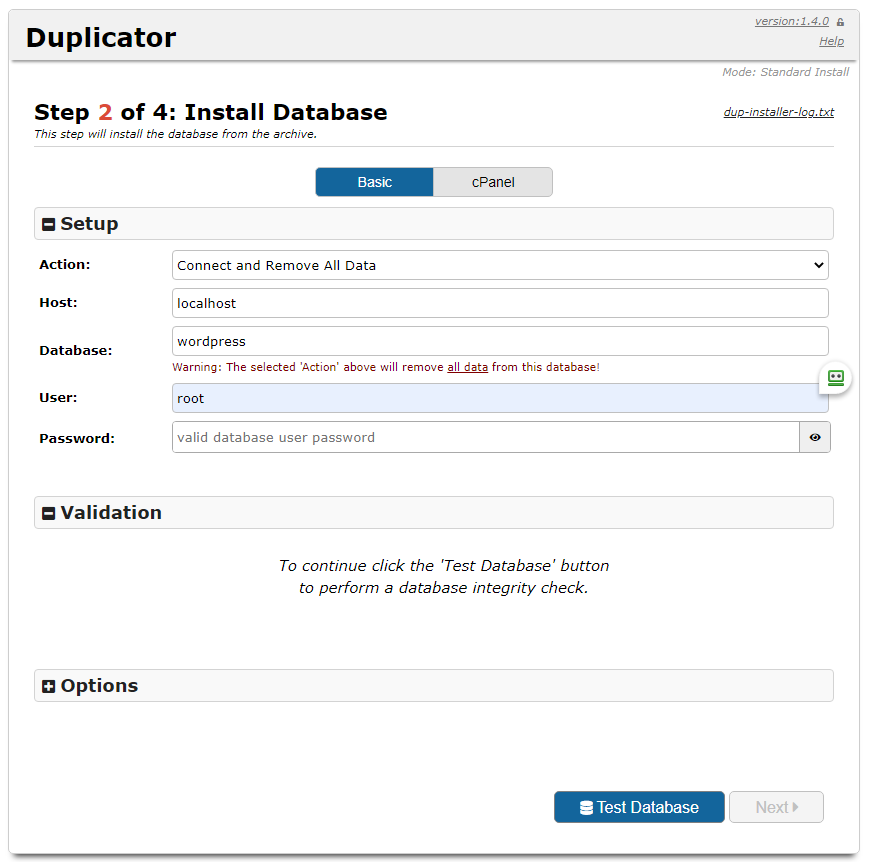
This is what you should fill in for the configuration:
If nothing else works, just stop the installation process. Things might still work (since it might have succesfully extracted the files and inserted the data into the database). Just delete all the duplicator files from the WordPress root folder. If you get a message saying “Briefly unavailable for scheduled maintenance. Check back in a minute.” you need to also delete the .maintenance file.
If you are using the amazing free InstantWP WordPress development package often, then you might start wondering how to properly use it with Git version control. The difficulty is that trying to add the entire Linux Alpine virtual operating system to Git is too heavy, but adding only the contents of the Theme folder will not keep track of your posts and other database related content. I will outline the steps I used to get Git working with IWP below:
When you are developing websites you often run into the need to test them on a server environment, because browsers block websites with certain features from running locally.
Here is a really quick way to run such a website in a server environment using Python 3 (which you probably have already installed on your machine anyways).
Open the command window where your website root folder is. One easy way of doing that is simply typing “cmd” in the Windows Explorer address bar.
Sometimes you need to create many elements so that each one of them gets a unique, incrementing number. You probably already know about VS Code’s Emmet capabilities which let you type something like .myClass*5 to automatically create five divs with the class “myClass”. So the output of that would be:
I recently encountered a problem in which it was impossible to login to the WordPress backend/admin area since the password field was not accepting any input. The same problem occurred on all the browsers I tested it in. It seems like an update might have broken something in a theme or a plugin. Finally there was an easy solution to the problem:
Just open the developer tools of your browser, target the password input field and delete the bit where it says “disabled” from the source code (displayed typically on the right side of you browser window in the Developer tools panel). Now the form field takes input again and you are able to login and update your plugins/theme if needed.
Here’s how the Emmet extension for Brackets can really speed up your workflow:
-type #mydiv and hit tab to get <div id=”mydiv”></div>
-type lorem and hit tab to get lorem ipsum text
-type #container>.col-sm-4*3 and hit tab to get <div id=”container”> <div class=”col-sm-4″></div> <div class=”col-sm-4″></div> <div class=”col-sm-4″></div> </div>