A Simple Image Sequence Player Made for 3D Artists

If you render image sequences, you know the pain:
scrubbing folders full of frames, guessing playback speed, or opening heavy software just to check timing.

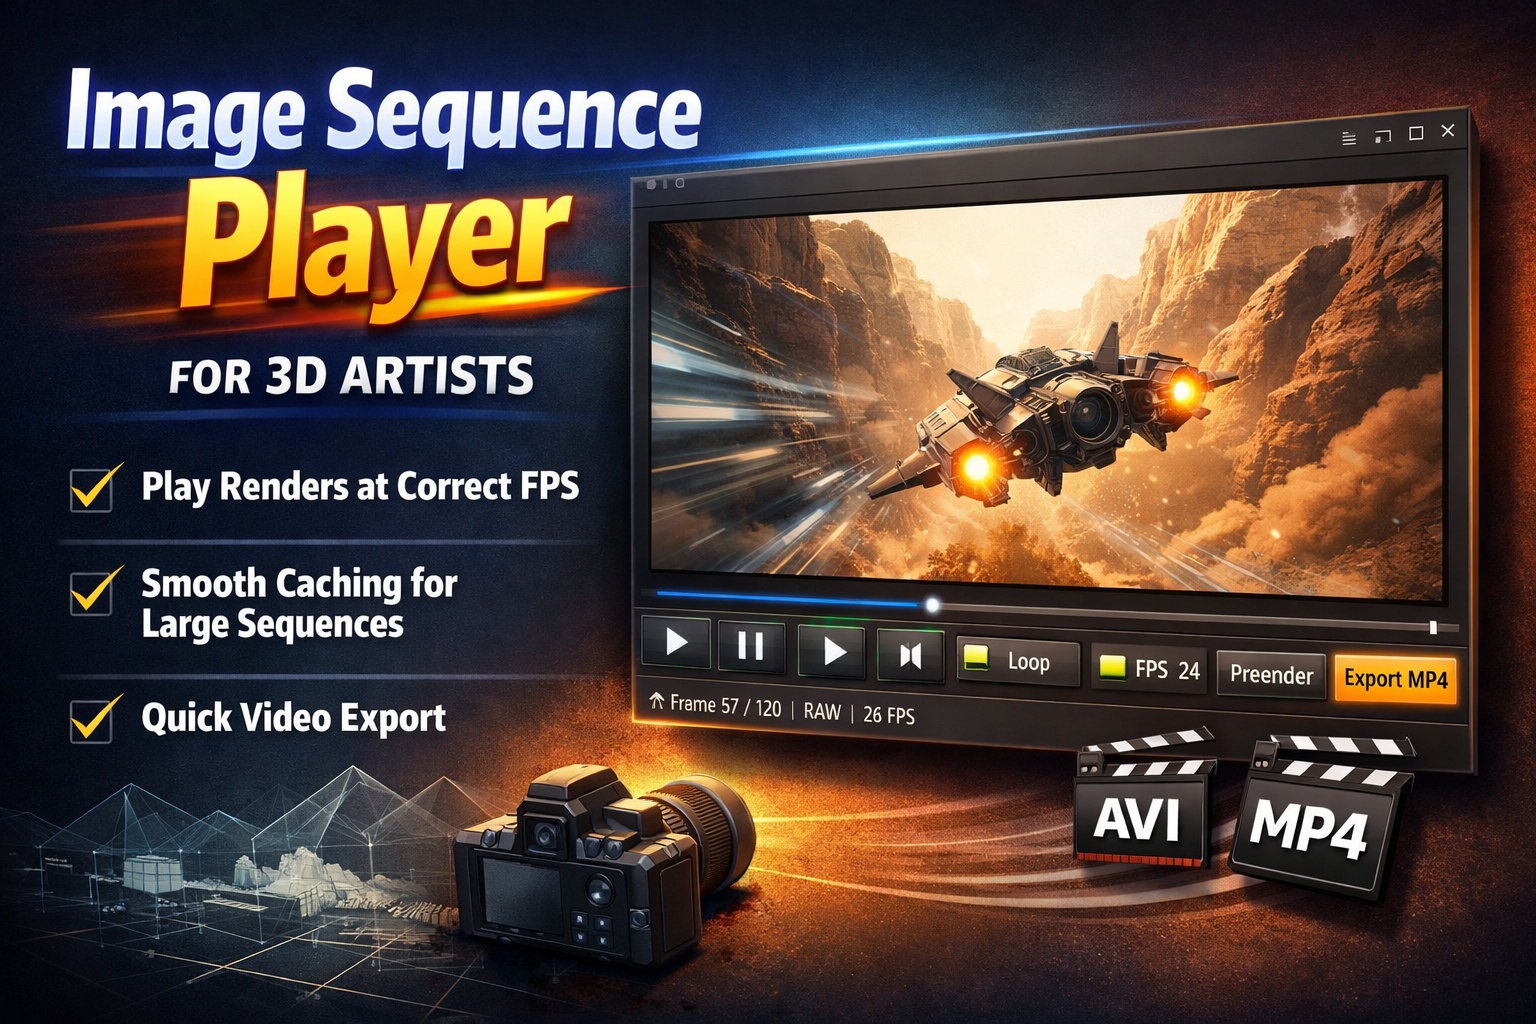
This Image Sequence Player is built to fix exactly that.


Play Your Renders at the Correct Framerate

Drop in a folder of images and hit play.
The player runs your sequence at a true, time-based framerate, so 24 fps actually feels like 24 fps—no drifting, no guesswork.

Perfect for:

  • Animation previews
  • Simulation checks
  • Camera move timing
  • Look-dev iterations

Smooth Playback, Even for Heavy Sequences

For larger renders, you can prerender the sequence into a cached video with one click.
Playback instantly becomes smooth and responsive—great for long or high-resolution sequences.

You can still scrub frame-by-frame when you need precision.


Loop, Scrub, Step — Instantly

  • Loop animations for motion checks
  • Scrub the timeline naturally
  • Step frame-by-frame forward or backward

No setup, no importing, no project files.


Export a Quick Video File

Need to send a preview to a client or teammate?

Export your sequence directly to:

  • AVI (fast, no recompression)
  • MP4 (easy sharing, universal playback)

What you see is exactly what you export.


Why Artists Like It

  • No timeline setup
  • No codecs to fight
  • No heavy software just to “check a render”
  • Fast, clean, and predictable

It’s the kind of tool you keep open next to Blender, Houdini, or Unreal—just for viewing.


Built for One Job, Done Well

This isn’t an editor.
It’s a viewer that respects time, framerate, and your workflow.

If you work with image sequences, this tool saves time every single day.

Download here:

https://github.com/AnttiPerala/simpleImageSequencePlayer/releases/tag/1.0


Finally, an insanely good pixel art AI

As a 2D game creator, I have been searching for an text-to-pixel art generator AI for a long time. It looks like we have finally arrived! Check out the results I got for the prompt

“a sprite sheet of several pixel art doors”!


Wow! Those are INSANELY good compared to previous pixel art generative AI’s!

So by now you must be dying to know which tool I used to generate those and how much it costs! Well I have good news for chatGPT users! I used Dalle-3, which you can now use for free with a chatGPT subscription! That’s right, since I already subscribe to chatGPT, I generated those awesome images for free!
This is getting really exciting for indie game developers everywhere!

A tool for recoloring pixel art to a new color palette

I have been searching through the webs for a long time for a good, easy to use tool for recoloring pixel art to a specified color palette. The perfect tool should make it easy and fast to test out different palettes for a provided bitmap image or a sprite sheet, but it should also make it possible to fine tune the color mappings and add new colors to the palette if needed.

This has provided to be a rather challenging task. Photoshop and other similar graphics programs do have the possibility to switch to indexed color which lets you force the image to a new color palette, but I find that workflow to be rather tedious and time consuming. Illustrator has the recolor artwork tool, but it works only with vector images.

Here are some of the tools that I did find:

Continue reading “A tool for recoloring pixel art to a new color palette”

Finally a sprite sheet recoloring process that works

I have been searching for a good workflow for testing out different color palettes for existing video game designs.

I have finally found a relatively pain free method of testing different color palettes and applying them to entire games. I will be making a video tutorial about this in the future, but before I get to that, I thought I would already explain the basics of the workflow.

Continue reading “Finally a sprite sheet recoloring process that works”

Basics of Using Cryptomatte in Blender 2.93

In the buttons area (on the right side of the interface), select the “View layer properties” tab.

Under “cryptomatte” turn on “object”, “material” or “asset”. I like “asset” since it let’s me select entire rigs that consist of several parts.

Go to the “compositing” workspace.

Turn on “use nodes”.

Add a viewer node with shift+a –> output –> viewer.

Add the cryptomatte node from Matte –> Cryptomatte.

Connect the image output from the render layers node to the image input of the Cryptomatte node. Connect the “pick” output from the Cryptomatte node to the image input of the viewer node. Render the scene (keyboard shortcut F12).

You should now see different matte colors that identify different assets in your render layer. Use the + button to access the eyedropper tool and select as many assets as you need for the matte you are building.

To see the actual matte, you can plug the “matte” output from the Cryptomatte node to the viewer.

Now you have a matte that you can use in various way when you are compositing. As a simple example, you could color correct the matted area by combining two copies of the input image with the “AlphaOver” node while using the matte as the factor. Then simply drop a color correction node like RGB curves between the bottom image connection.