In this quick tip I show you how to reset the Blender UI to it’s default settings:
Rendering via the VSE
Using the VSE editor to render out multiple sequences can be helpful. You can easily queue up different sequences for a single render and you can do nice effects like time remapping as well. But it’s usually recommended to use a separate scene for all the VSE stuff so that you don’t run into weird problems. The question becomes, how do you control the render settings: is it from the linked scene render settings or from the VSE scene render settings? Here’s a quick rundown:
-The resolution of both scenes will affect the outcome: if your animation scene has a resolution of say 10 x 10 and you VSE scene has a resolution of 1920 x 1080, then the image will be stretched from 10 x 10 to 1920 x 1080 and the result will be incredibly blurry. If you do it the other way around so that the animation scene has a big resolution and the VSE sequence has a smaller resolution, then you are wasting render time because Blender will render the larger number and the scale it down for the VSE.
-The sampling and light path settings will be taken from the animation scene (not the VSE scene)
-The file output location will be taken from the VSE scene
-GPU vs CPU setting will be taken from the individual animation scenes (you can render some sequences with GPU and others with CPU)
-Motion blur will (thankfully) be taken from the animation scene (the motion blur setting in the VSE scene won’t affect anything)
Strategies for multi-scene workflows
I have been trying to find a workflow for animating in Blender that makes it possible to keep tweaking the model after the animation process has already started. An ideal solution would allow the user to link the same object into multiple scenes and animate them separately in each one of those scenes, without messing up any other scenes. Editing the mesh in one scene should automatically ripple into all scenes. This, however, is unfortunately not easily achieved in Blender. Here are some approaches that I have tried and their pros and cons:
Option 1: Separate file for the model and the use of proxies
This first option goes basically like this:
-Create your model and armature in a separate .blend file, say a file called “Character”
-Select all parts of your model and the armature and group them together (ctrl+G)
-Create a new .blend file called something like “Animation”
-Use the file –> link option to link the group from the “Character” file to this “Animation” file
-In order to actually select or animate the armature, go to object –> make proxy and choose the armature from the list
-Now you can animate the armature
Pros:
+ Changes to the “Character” .blend file will automatically reflect to all other .blend files linking to it
Cons:
– Sometimes laggy
– Changing things like shape keys need complicated driver setups (shape keys need to be driven by the armature)
– You can’t make any changes to the mesh without making it also a proxy and making the mesh object a proxy will lose all the modifiers it might have had
Option 2: Sharing armature and mesh data between scenes
This option works in the following way:
-Create your object and rig in Scene 1
-Animate your rig in Scene 1
-Create a new Scene (Scene 2) using the “link objects” option
-In Scene 2, create a new armature (call it Scene 2 Armature) and then link the original armature to it in the “object data” settings (the very first option there “armature data” allows you to link to other armatures). You have now the same exact armature, but without the animation
-In Scene 2, create a new mesh object and in the “object data” tab link the original mesh from Scene 1 to it
-Select the new object, then shift select the original object and transfer the vertex groups by clicking on the little black triangle in the vertex group settings and choose “copy vertex groups to linked”.
-Add the armature modifier to the new mesh object and point it to the Scene 2 Armature -object
-You have now the exact same setup from scene 1, but without the animations
Pros:
+ Changes to the armature or mesh in Scene 1 will automatically update to all other scenes
Cons:
– Takes some time to setup every time you create a new scene
– Shape keys won’t work independently: animating a shape key in Scene 1 will create the same shape animation in all scenes. In my opinion this renders the workflow useless.
Option 3: Make full copies out of the scenes but manually link the mesh data when you update the mesh
This option works like this:
-Create your mesh and rig in Scene 1. Name your mesh object something like “Character Master”
-Animate it in Scene 1
-Create Scene 2 and use the “full copy” option
-This will give you all the same objects and positions and animations from Scene 1 but you can now manually edit them and the changes won’t reflect back to other scenes
-When you update your character design in Scene 1, you do the following procedure in all the other scenes:
*Select the object that needs to be updated
*Go to the “object data” tab and link it to the original mesh (Character Master), this will update the mesh.
*Severe the link immediately by clicking on the little number next to the name filed (in order to make a single user copy). This will make sure that animating things like shape keys in Scene 1 won’t show up in Scene 2.
Pros:
-You have full control over everything: shape keys, the armature, modifiers etc
-There is no danger of messing up things in other scenes
-Fast to setup
Cons:
-You need to manually update your meshes in all scenes when you make changes to the master mesh in one scene
-If your mesh in Scene 2 had shape key animations, you lose them in the update. You can remedy it a little bit by copying the shape key keyframes in the dope sheet and pasting them back to the updated object. Note that you need to first hit the i-key once over the shape key slider to get the appropriate animation channels (otherwise you will get an error when trying to paste).
Corrective shape keys for meshes transformed by armatures
Sometimes it might be handy to use shape keys in order to smooth out problematic bone driven distortions in a mesh.
The trouble is that when you try to edit a shape key, the mesh will jump into edit mode without the armature distortion taken into account.
The solution is really simple: select the mesh, go to it’s modifiers tab and activate the “display modifier in edit mode” for the armature modifier! Now you can see the deformed mesh in edit mode which makes creating corrective shape keys much easier!
Relative output file paths in Blender
Rendering animations can take a lot of time, so often you want to do it using several computers. So you prepare your scene and save your .blend file and copy it to another computer for rendering purposes. But when you start rendering, you might quickly notice that the output file path is not working, because by default Blender will write absolute paths which will not work on a computer with a different user name.
The solution is to use relative output file paths. It’s as simple as starting the output file path with two forwards slashes like this: //
So if you want to have all your renders go next to your .blend file in a folder called “renders” and in a subfolder named based on say your current file name, it would look something like this:
//renders\version72\
Here’s a screenshot of my current project and it’s file output field:
This will make rendering the same blender-file on different computers much less of a headache!
Anaglyph modeling in Blender
Written instructions:
Continue reading “Anaglyph modeling in Blender”
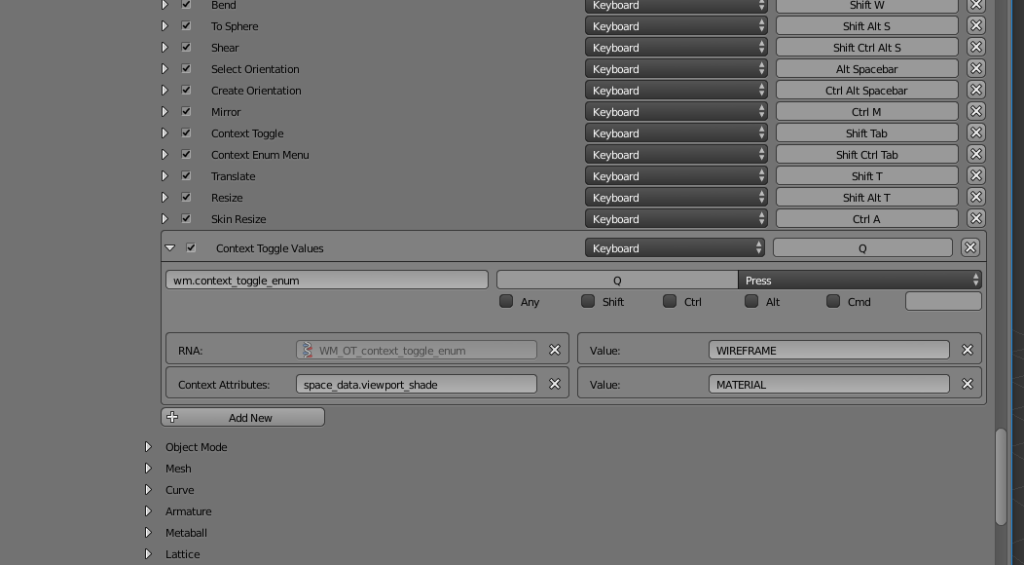
Toggle between material viewport shading in Blender
Are you frustrated how tedious it is to switch between the “material” viewport shading mode and other modes like wireframe?
Here’s how you can add a keyboard shortcut to allow quick toggling to the material shading.
Steps:
1. Open up file –> user preferences –>input
2. Open 3d view and then 3d view (global)
3. Scroll down and click “add new”
4. Type wm.context_toggle_enum to the identifier field
5. Type space_data.viewport_shade to the context string field
6. Type WIREFRAME to the upper value field
7. Type MATERIAL to the lower value field
8. Set the keyboard shortcut you desire by clicking on the “press a key” button, in our case we chose Q
Below is a screenshot of the finished settings:
Add sine-wave motion to an object via drivers in Blender
In this video tutorial we add a driver in Blender that will automatically produce sine-wave movement to our object.
Written instructions:
Continue reading “Add sine-wave motion to an object via drivers in Blender”
Enabling Microdisplacements/Adaptive subdivision in Blender
Here are the steps for testing out the new microdisplacement possibilities in Blender:
1. Switch to Cycles render engine
2. Go to user preferences –> system –> enable opensubdiv compute (choose CPU as the compute device unless you have a good graphics card)
3. Set feature set to “Experimental” (on top of the render settings)
4. Add a subdivision surface modifier to the default cube and check “use opensubdiv” and “adaptive”
5. Add a material to the cube and set it’s displacement to “true” instead of “bump”
6. Go to the node editor, add a noise texture and connect it to displacement
7. Control the intensity of the displacement by adding a math node in between and setting it to multiply
8. Turn on preview rendering (in viewport shading). You might need to tab between edit and object mode sometimes to refresh the preview.
Change brush hardness in Blender
This quick tip shows you how you can make your brush edges hard instead of soft in Blender:
EDIT: In 2022 This setting is found under “falloff” where you get the curve if you choose “Custom” first from the falloff dropdown.